Version Control with RStudio and GitHub
This exercise is divided in two parts:
- Getting set up with Git and RStudio
- 1.1. Configure Git
- Version control with RStudio and Git
- 2.1. Setting up a version controlled project in RStudio
- 2.2. Making changes
- 2.3. Setting up a remote repository on GitHub
- 2.4. Subsequent workflow
- 2.4.1. Pull and push changes
- 2.4.2. Create a new branch
- 2.4.3. Make and push changes to a branch
- 2.4.4. Pull request and merge changes
- Summary
1. Getting set up with Git and RStudio
By now you should have a GitHub account (sign up here and get setup here) and Git installed on your laptop (Download Git here). Let us know if you don’t or you will not be able to go trough the rest of this tutorial. In order to connect RStudio with GitHub we need to configure Git, which is the version control software that GitHub is built on. First let’s make sure that we have actually installed Git.
Windows
-
Go to the Start menu
-
In the Search or Run line type
cmdand press enter
Mac
- Go to Applications -> Utilities -> Terminal
Linux
- Open a terminal (
Ctrl+Alt+Toften does it)
Type git version. You should see a short message containing some version information (Let us know if you don’t).
1.1. Configure Git
After installing git, you need to tell it who you are. Open a terminal window or command prompt (see above) and type the following:
git config --global user.email "you@youremail.com"
git config --global user.name "Your Name"
On succesful completion, you should see no output from these commands. You can also configure git to use your preferred editor for commit messages, e.g. on a Mac or Linux:
git config --global core.editor nano
or on Windows:
git config --global core.editor notepad
It’s a good idea to follow this step since the default editor selected by git is quite difficult to use!
If the above commands in the terminal/command prompt seem like magic, or you just want to learn more about using git, try their excellent online guides that let you learn to write git commands directly in your web browser. This is also an excellent place to learn more about what we will discuss below, without worrying about messing up any actual files.
2. Version control with RStudio and Git
2.1. Setting up a version controlled project in RStudio
RStudio provides an interface for version control using git. We’ll look at setting up and managing a version controlled project through RStudio.
Create a new project in RStudio as follows:
File -> New Project -> New Directory
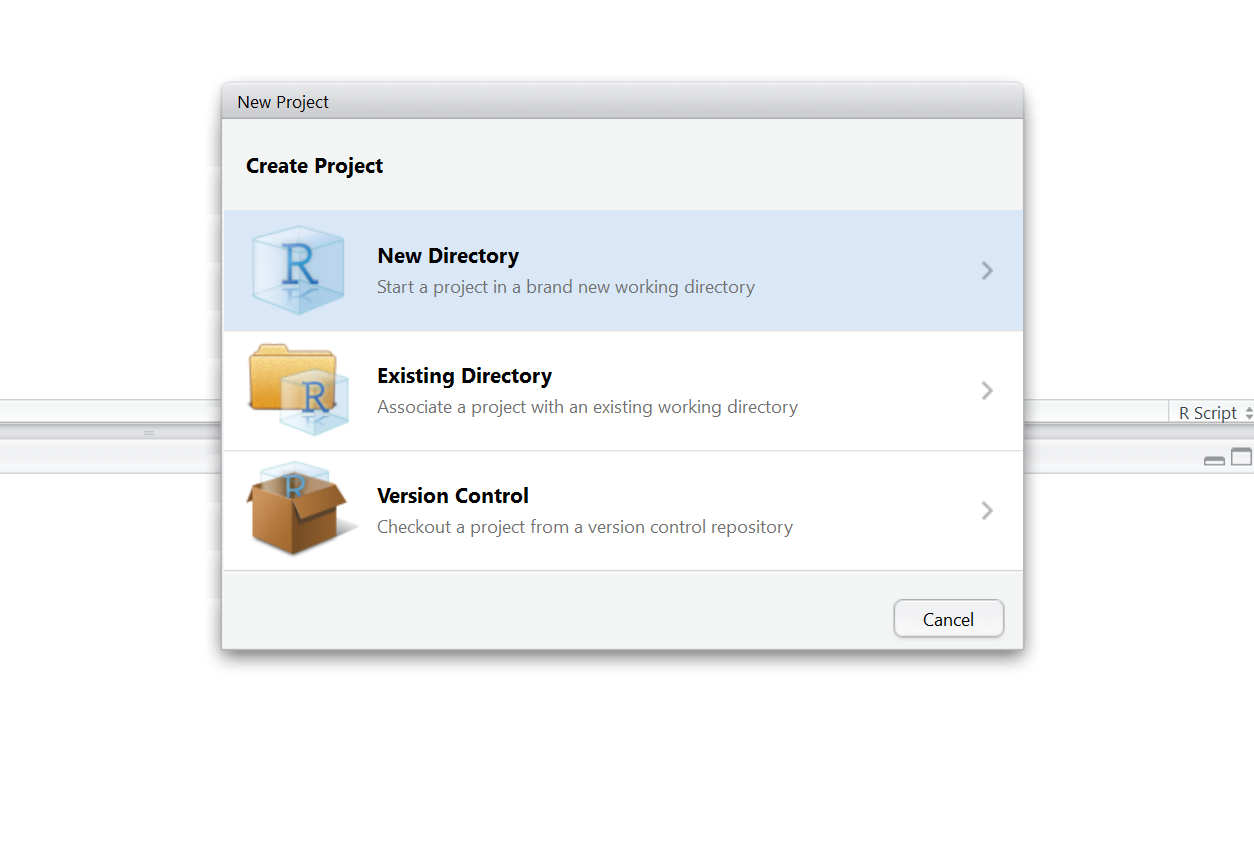
Then click on Empty Project
![]()
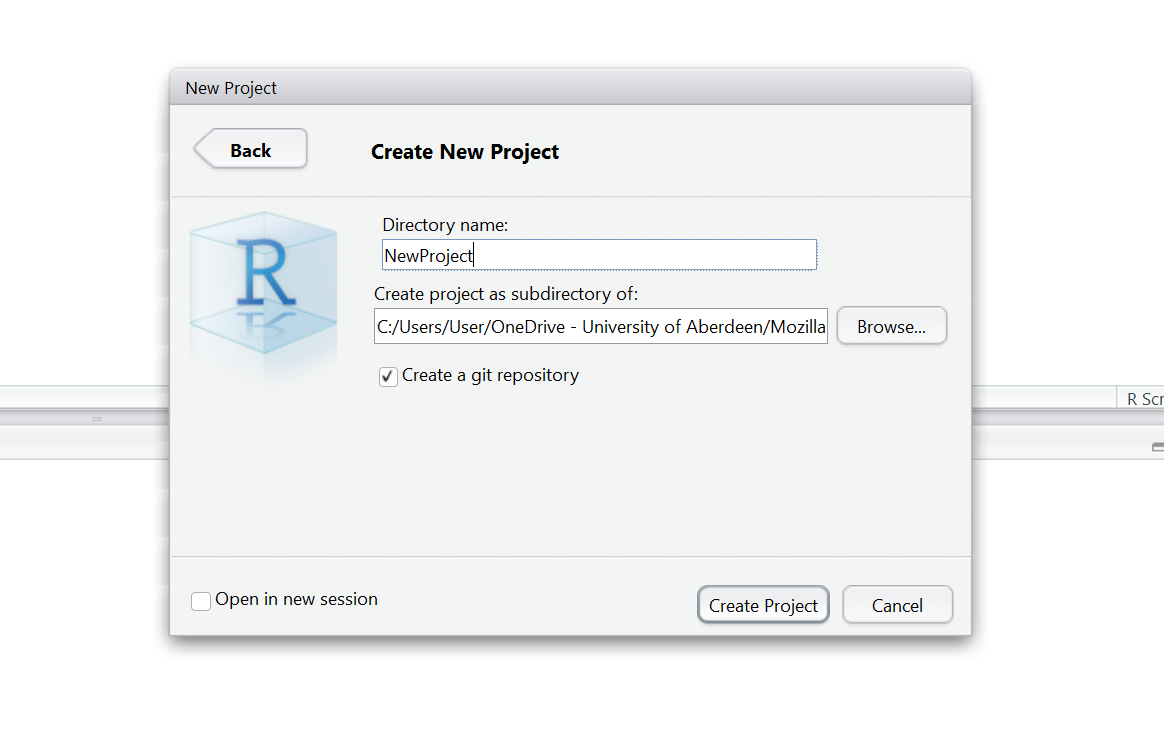
In the Create New Project screen, give your project a name,navigate to the directory you want to save your project in and make sure that Create a git repository is checked. Then click on Create Project.
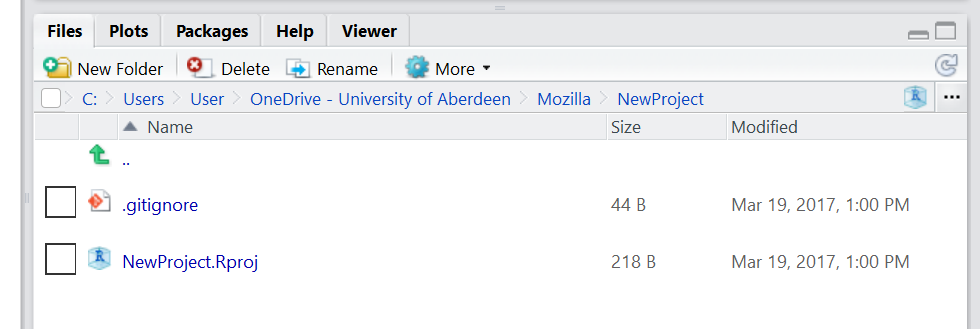
Two files are created in the otherwise empty project:
-
.gitignore – Specifies files that should be ignored by the version control system.
-
NewProject.Rproj – Configuration information for the RStudio project.
Once your project is set up, you can start work on your code, perhaps by creating an R script that reads in your data and carries out some preliminary analysis. For the purposes of this tutorial, start by creating a simple script containing these few lines of R.
First open a new R script as follows:
File -> New File -> R Script
Then, in the new empty R script, type the following lines of code, and click on the Run button in the top right corner of you script.
data(cars)

plot(cars)
The first line of code loads the dataset cars into R and the second line plots the data.
Now you can save your script by clicking on the disk icon in the top left corner of your script. RStudio will automatically save your script in your project directory, so just give it a name and click Save.
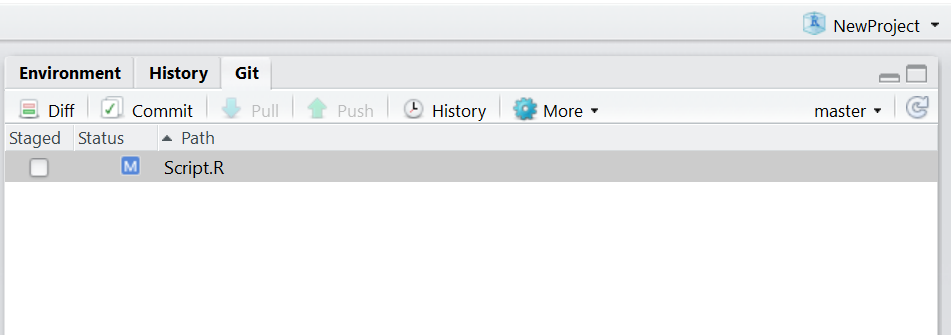
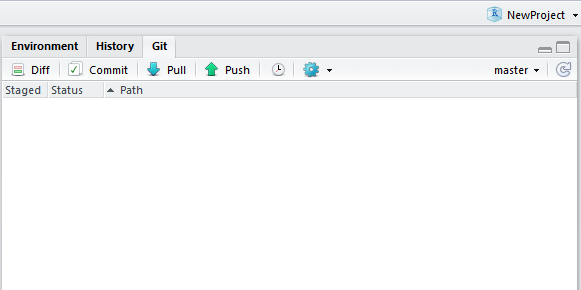
After you’ve created this file in your project, you need to get it under version control. By default, the git version control pane is in the top right hand corner of RStudio. Find it and click on the Git tab. You’ll see a list of the files in your project directory.
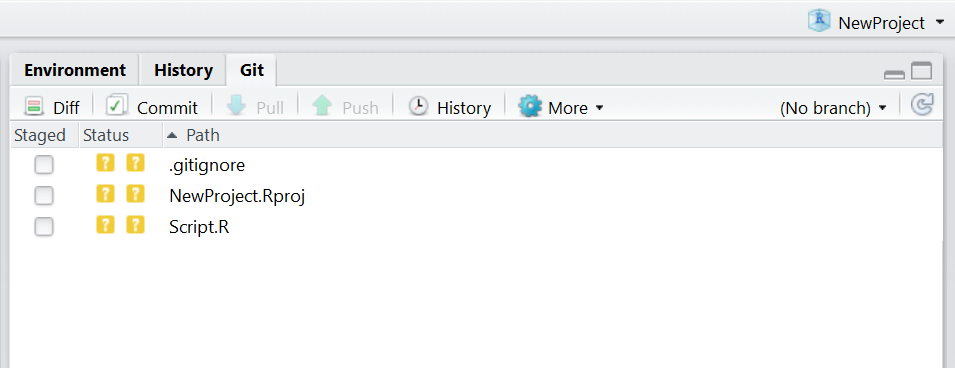
If you hover the mouse pointer over the yellow ? marks in RStudio, you’ll see a tooltip telling you that the files are untracked. This means that git is not tracking versions of these files.
Git will only keep track of modifications to files that it has been asked to manage, so you need to tell git which files to track.
Tick the Staged checkbox for each file.
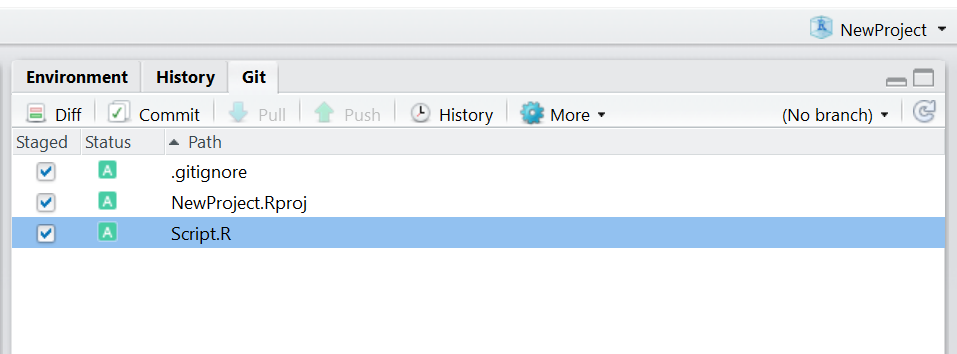
All of your files are now staged, ready for you to record those changes as a commit. Each commit creates a snapshot of the project directory, allowing you to record the state of your project through time.
Click on Commit.

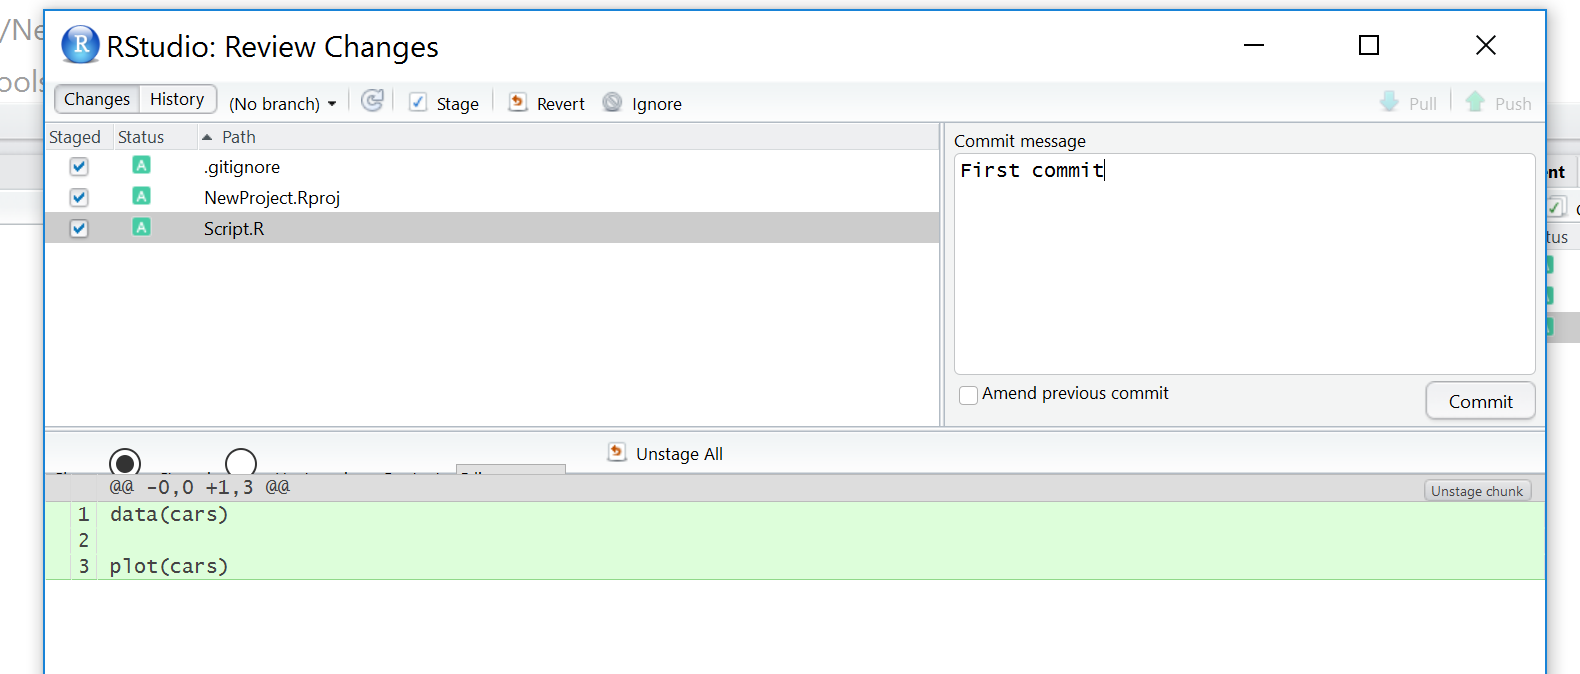
This will open a pane showing details of the commit. You need to specify a commit message in the right hand panel. Commit messages should explain why you have made a change and not what you have changed. Git keeps track of what has changed (see use of Diff below) and so it is best not to use commit messages for this purpose. The commit message lets your future self know the current state of your mind why you made this change or it will inform collaborators why the change was made.
Since this is the first commit, you can follow tradition and use a brief message such as First commit, but for subsequent commits it’s worth providing a more descriptive message. Once you’ve typed a commit message, click on Commit.
A message displaying the output from git will be shown.
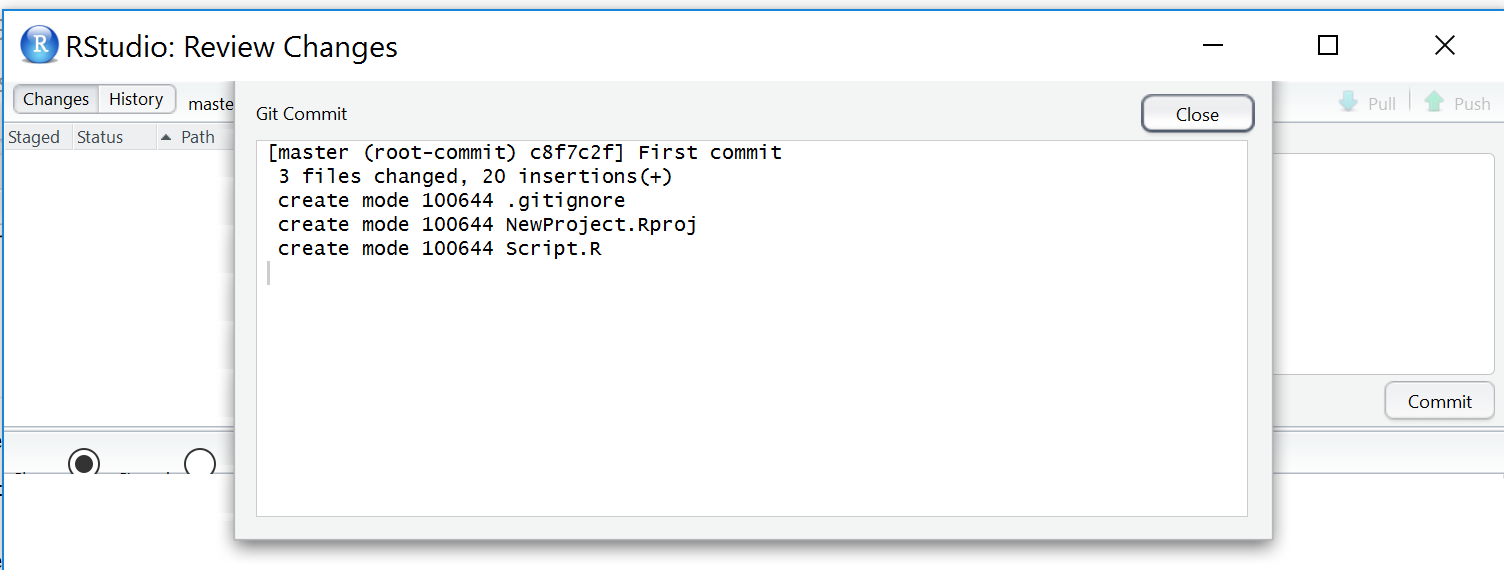
Click on Close and you are done.
2.2. Making changes
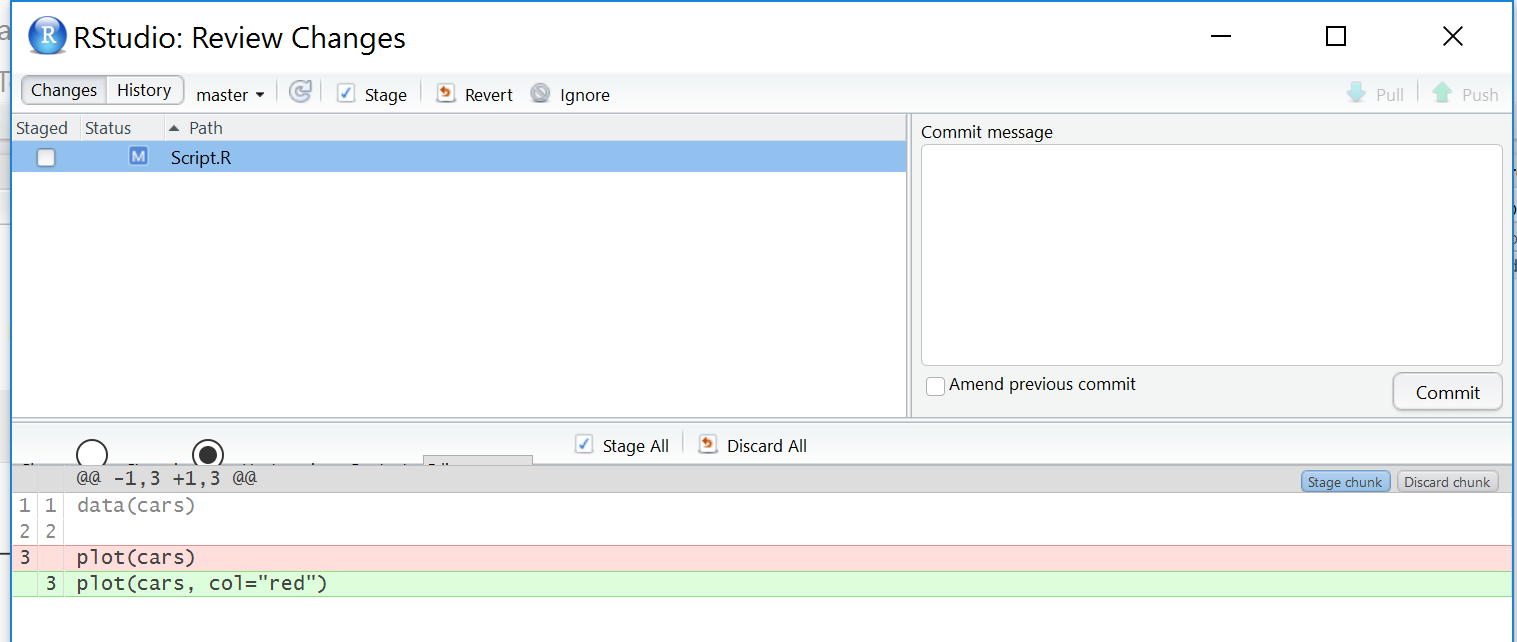
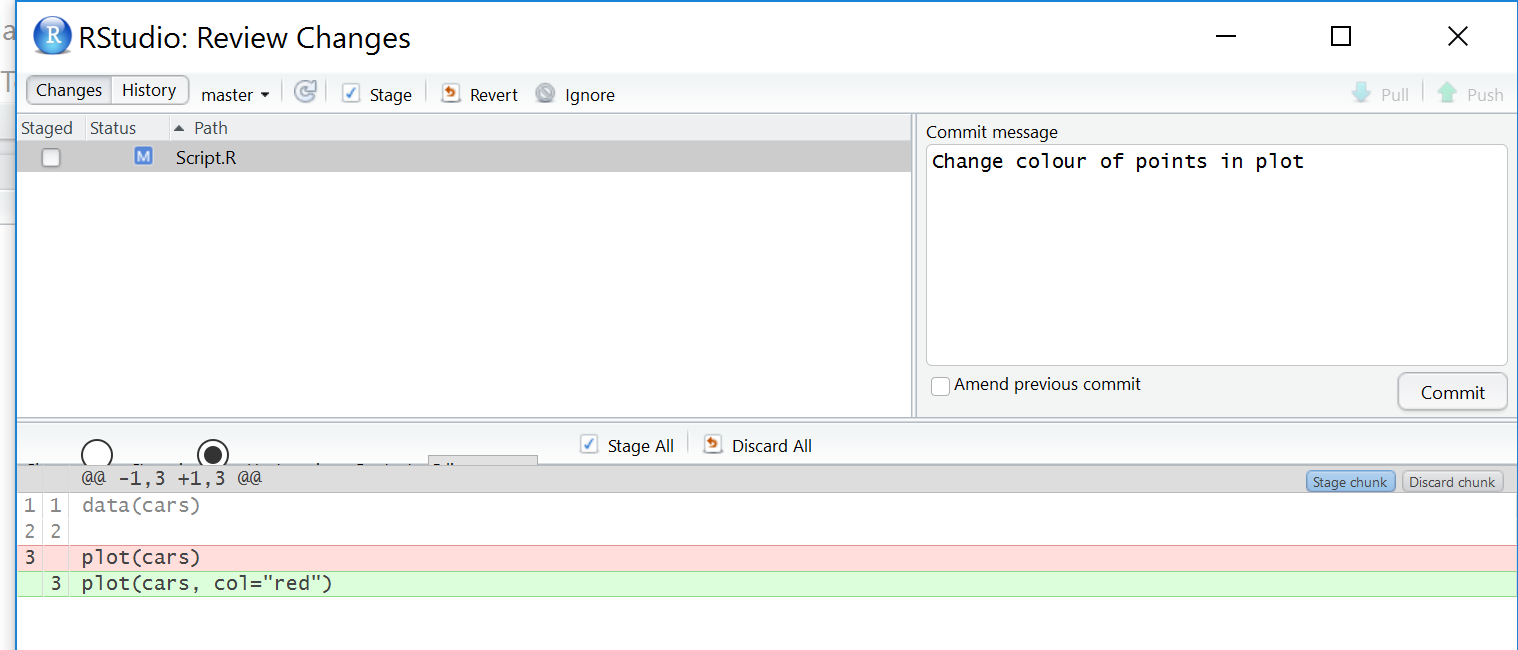
Now we want to make some changes to our R script. For example we could change the colour of the dots in the plots from black (the default) to red. Change the line in your script that makes to plot to:
plot(cars, col="red")
Save the script.
Now, click on the Git tab in RStudio. You’ll notice that there’s only one file listed, since RStudio only lists files that have changed in its git interface.
Click on the Staged checkbox to stage your change. Now click on Diff (next to Commit) to display a summary of what’s changed. Lines that have been added are green. Lines that have been removed are red.
(Note that from git’s point of view, a modification to a line is actually two operations: the removal of the original line followed by the creation of a new line.)
Add a commit message and click on Commit.
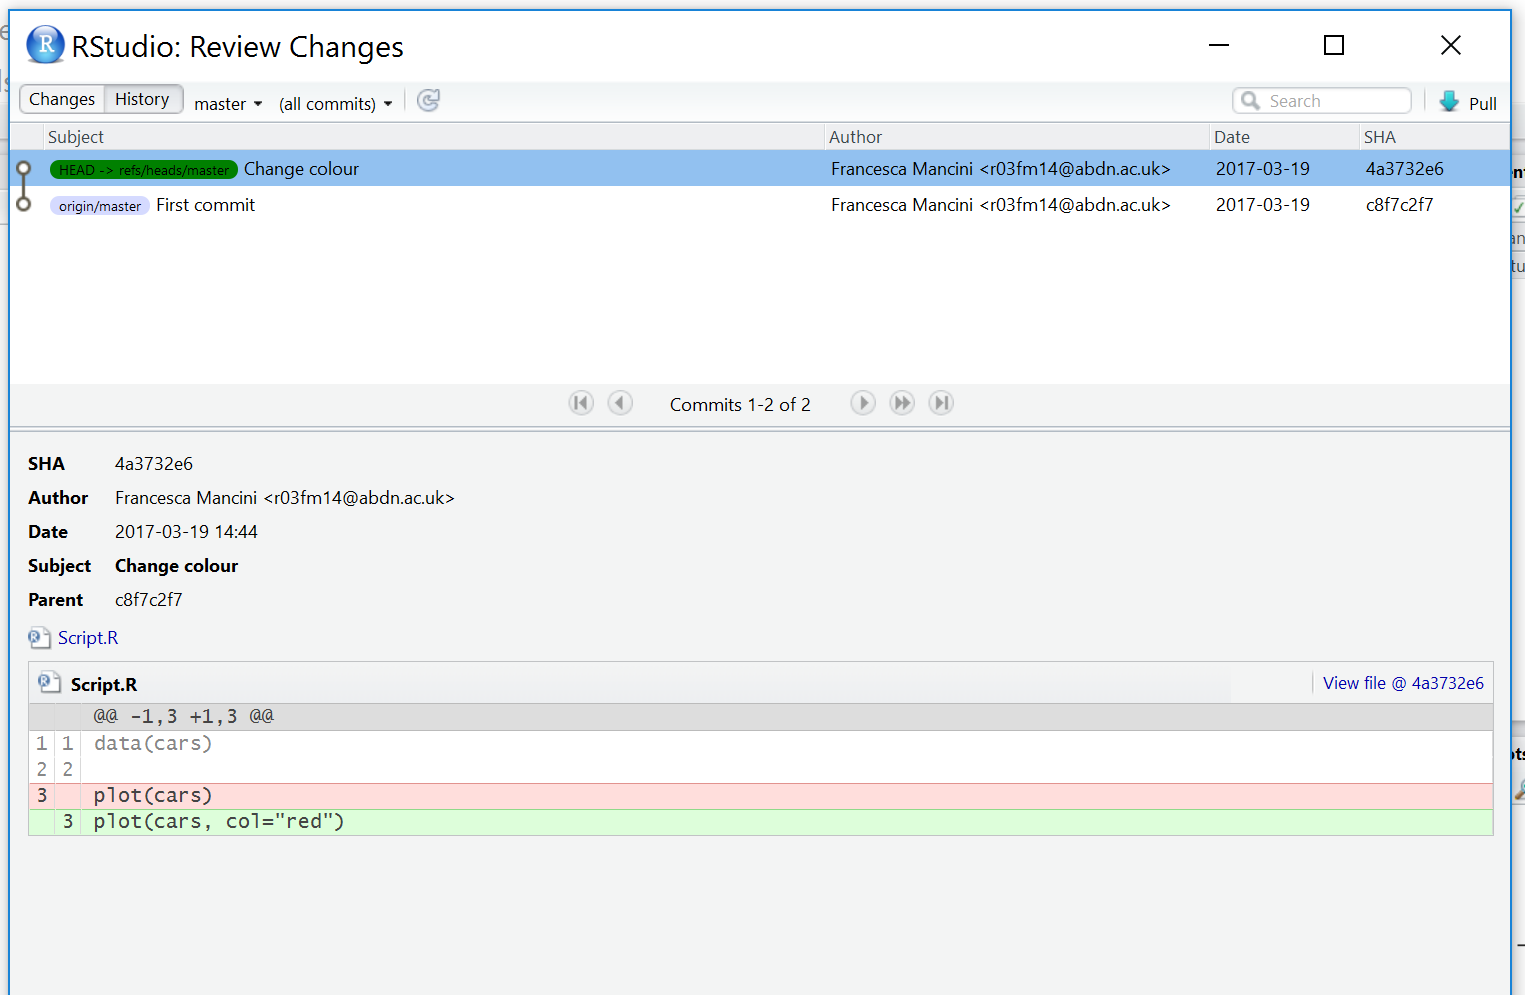
In the Git tab of RStudio, click on Diff and then History. You’ll see that you can look through every commit you’ve ever made. This can be extremely useful for finding bugs or looking back to how your model looked a few months ago.
2.3. Setting up a remote repository on GitHub
Your project is fully version controlled so you have access to a detailed history of every change you’ve ever made to it. This is a great first step but all of this only exists on your own computer at the moment.
Likely you’ll want to connect your local repository to a remote repository using a hosting service such as GitHub. Syncing your local repository to a remote means that your code is backed up. Also, the remote repository acts as a central store for your project, allowing you to share your work or to access it from another computer.
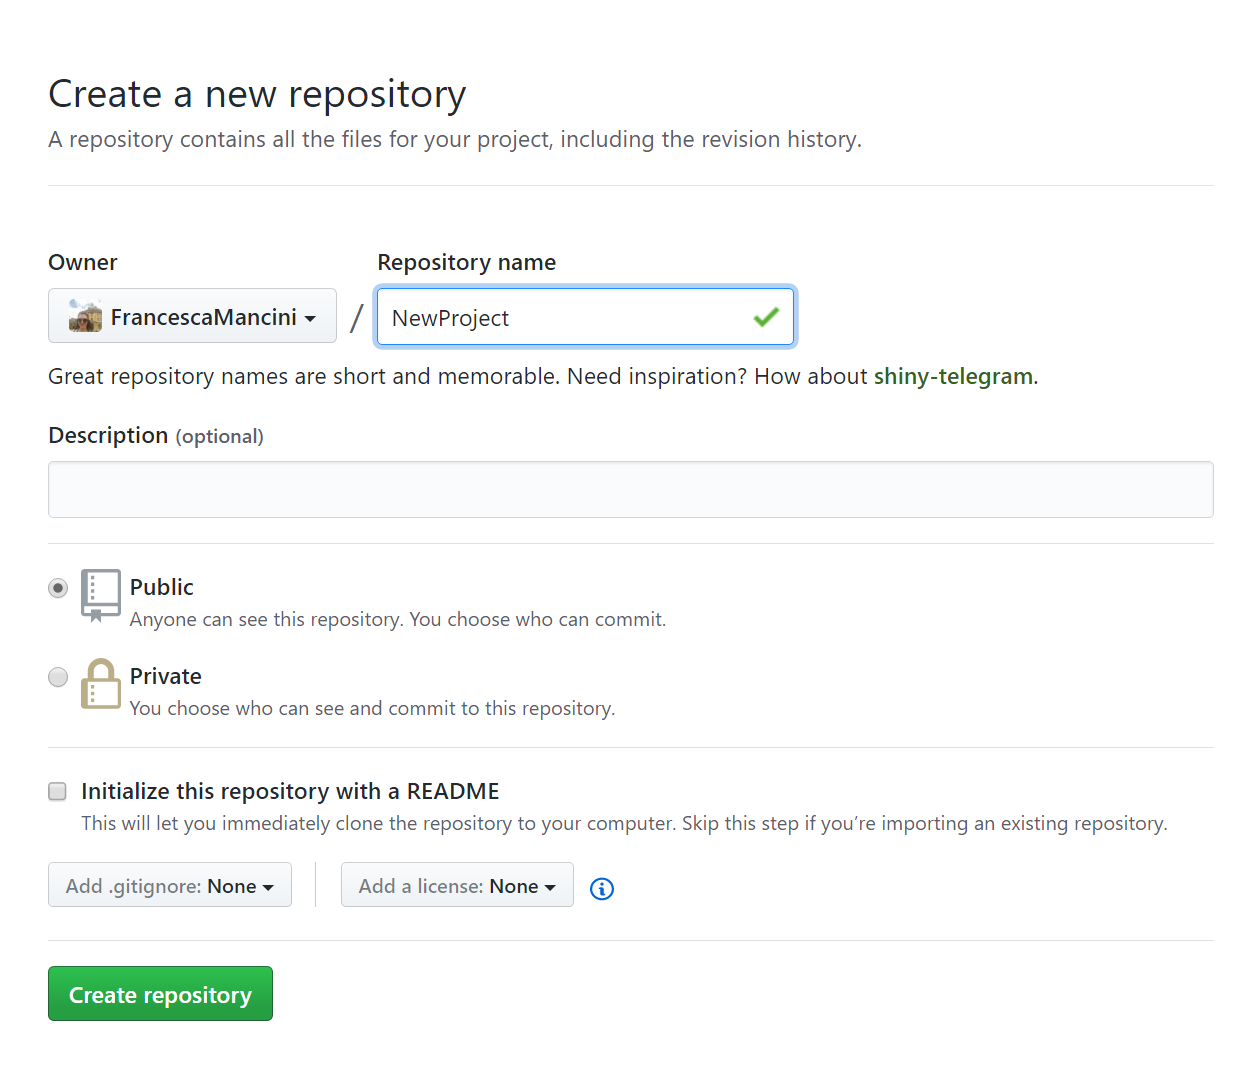
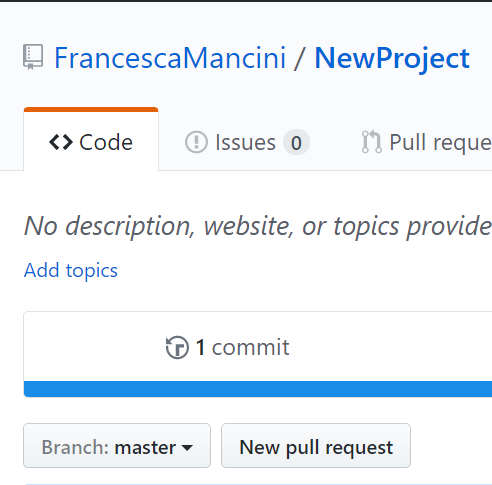
First, you need to create a GitHub repository to use as a remote. Log into GitHub and go to your profile page. On the Repositories tab, click New.

At the Create a new repository screen, give your repository a name and click Create Repository.
The next screen gives sets of git commands for use in various circumstances. Find the section labelled …or push an existing repository from the command line and copy the commands to the clipboard.

These commands tell git to set the remote repository for your local repository.
In RStudio, navigate to the Git tab and click on More -> Shell….
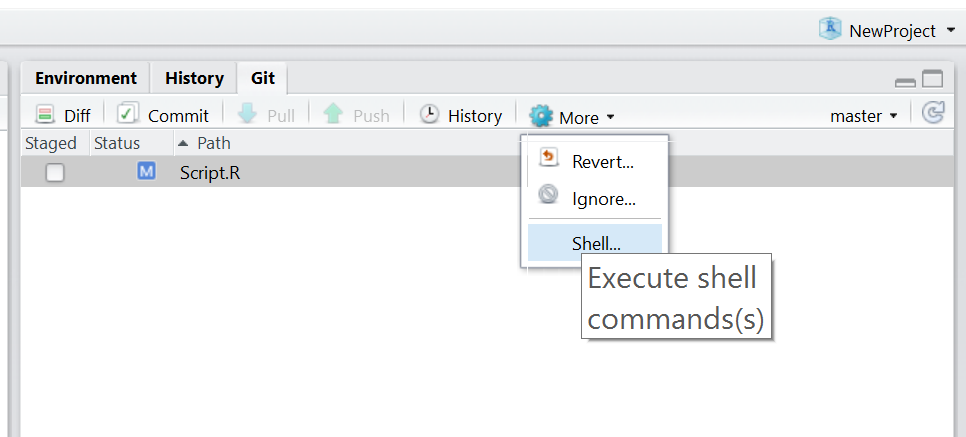
Paste the git commands into the shell and press Enter to execute them.
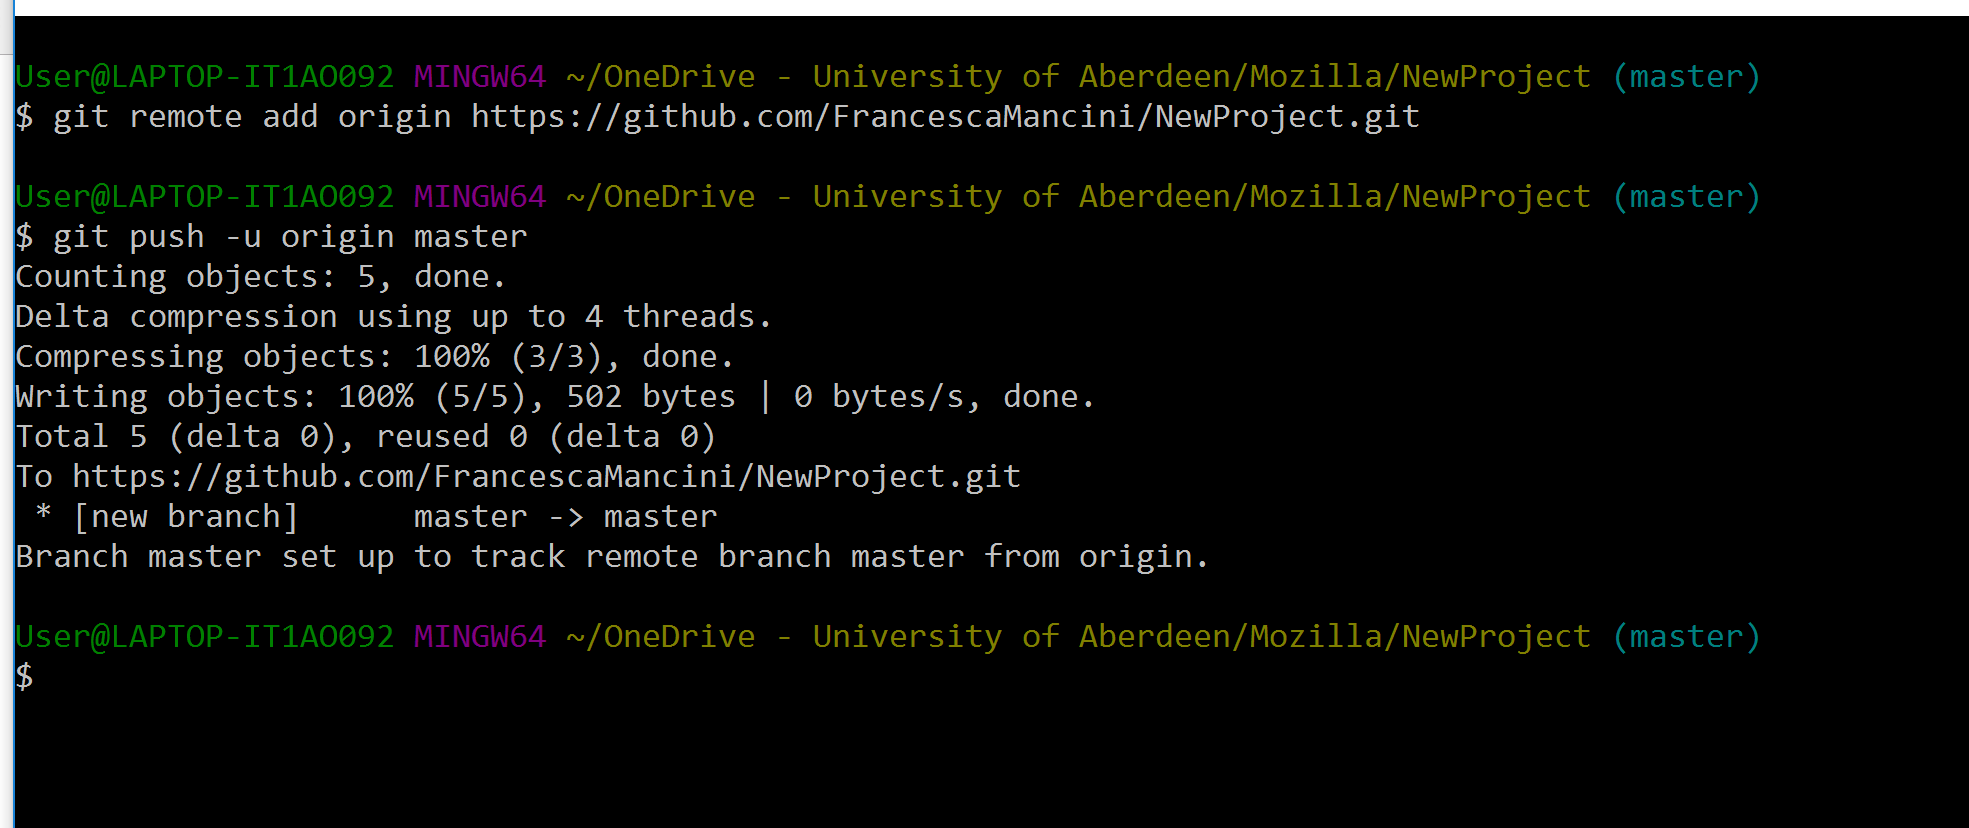
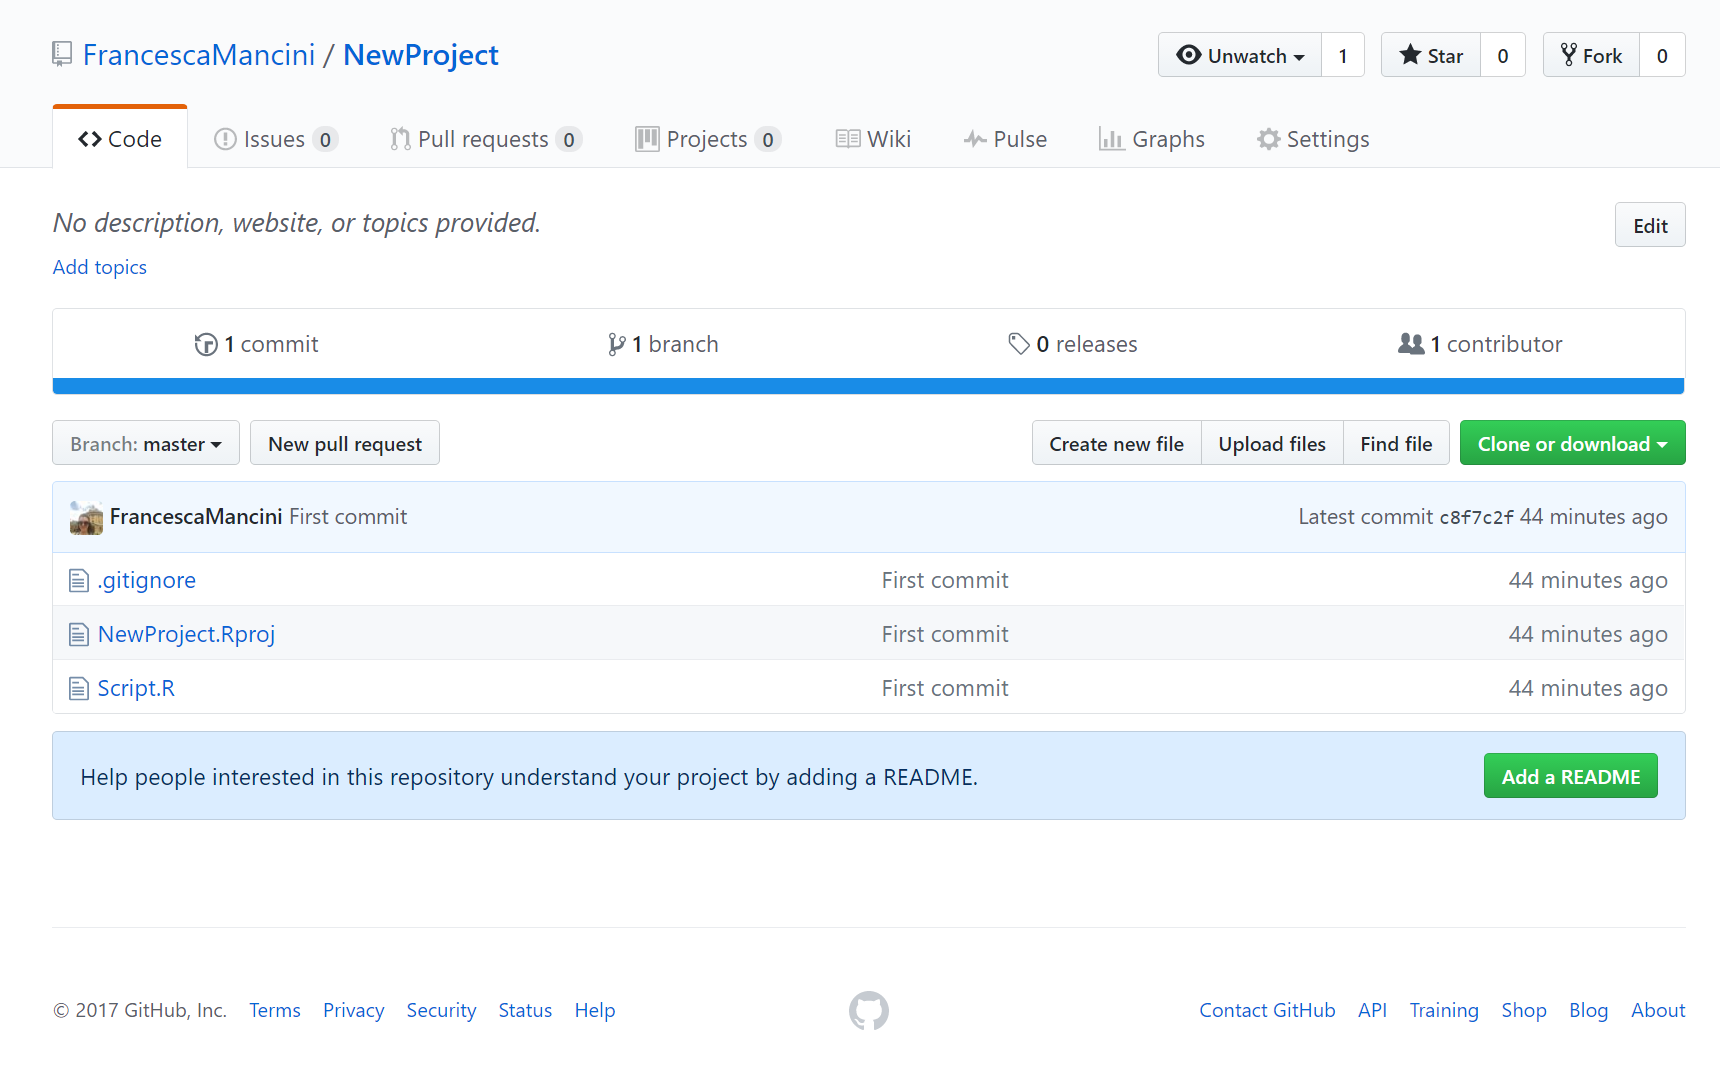
Confirm that the project has been uploaded to your GitHub repository.
It should look like this:
It is good practice to always add a README.md file to your repository. A README.md file describes your project and all the files that are in the repo. A good README.md file makes it easy for others (or the future you!) to use your code and reproduce your project.
You can create a README.md file from RSTudio or in GitHub. Today we will be using the second option.
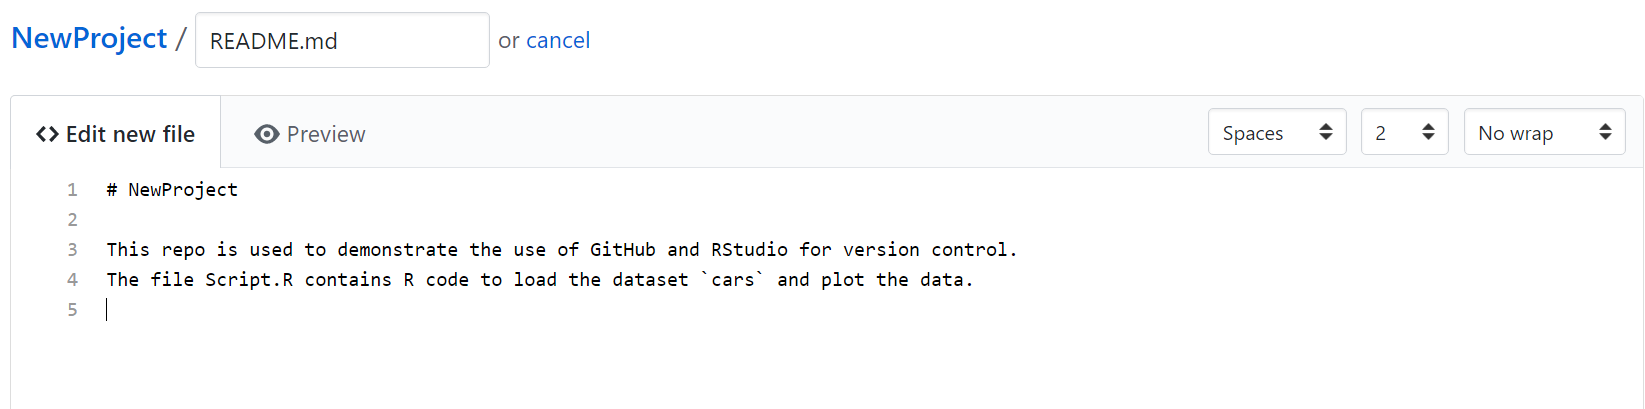
From the page of your repository in GitHub click on Add a README.

Now write a short description of your project, something like this.
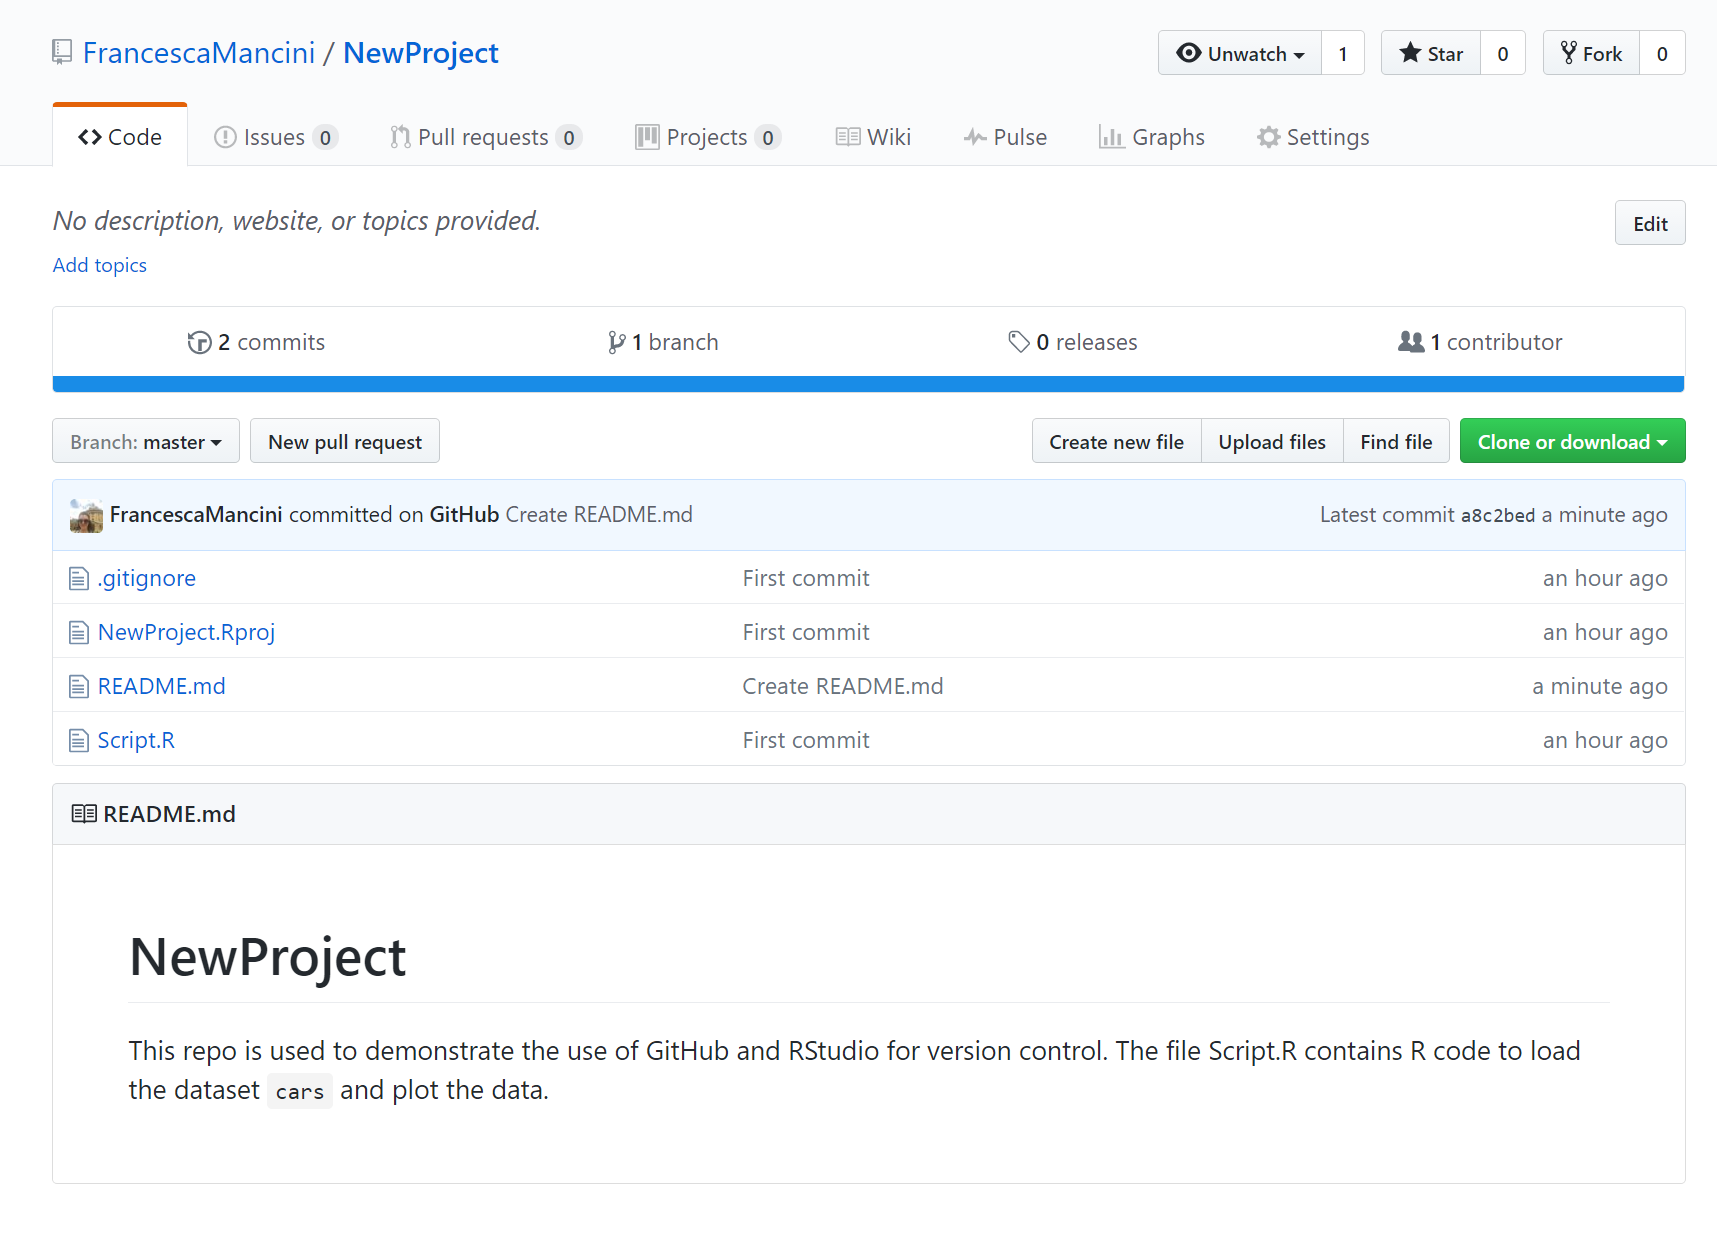
At the bottom of the page, you can now change the commit message and add a more detailed description of your changes if you like. For the purpose of this exercise the commit message “Create README.md” is good enough. Click on Commit new file.
Your repo should now look like this:
2.4. Subsequent workflow
Once a local repository has been associated with GitHub, it’s not necessary to use the command line for subsequent uploads. However, you will want to always keep the local (e.g., your personal computer) and remote (e.g., GitHub) in sync with one another. To do this you will Pull and Push changes from one place/repository to the next.
2.4.1. Pull and push changes
When you start working on your local repository (e.g., files on your own computer), it is best to start by Pulling any new changes off of your remote repository (e.g., GitHub). Similarly, when you are finished working on them in your local repository (e.g., your computer) it is good to then Push them to the remote repository (e.g., GitHub). We will walk through this basic workflow that enables you to keep your local files in sync across multiple computers or when files may change because of someone else working on the project.
To start working on a project, Pull any new changes to update your local copy.
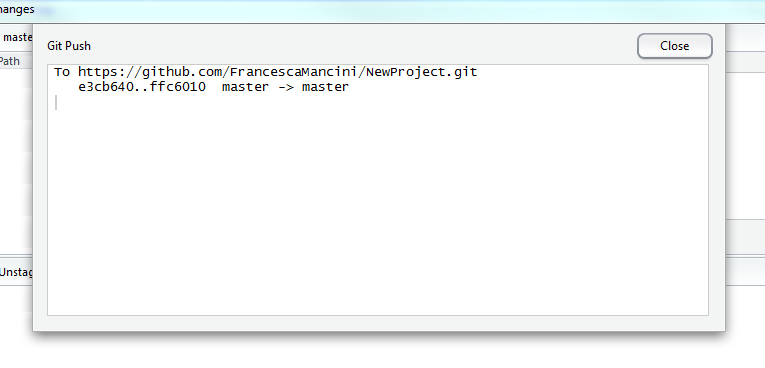
Now you can make changes on your own computer. When you are finished, to Push these changes to the remote repository (e.g., GitHub).

and you should see
2.4.2. Create a new branch
Now we need to create a Branch. Branching is the way to work on different versions of a repository at one time.
By default your repository has one branch named master which is considered to be the definitive branch.
We use branches to experiment and make edits before committing them to master.
When you create a branch off the master branch, you’re making a copy, or snapshot, of master as it was at that point in time. This is particualrly useful when you are working on a collaborative project. For example, if someone else made changes to the master branch while you were working on your branch, you could pull in those updates.
Go to your repository and click the drop down at the top of the file list that says branch: master. Type a branch name into the new branch text box. Select the blue Create branch box or hit “Enter” on your keyboard.
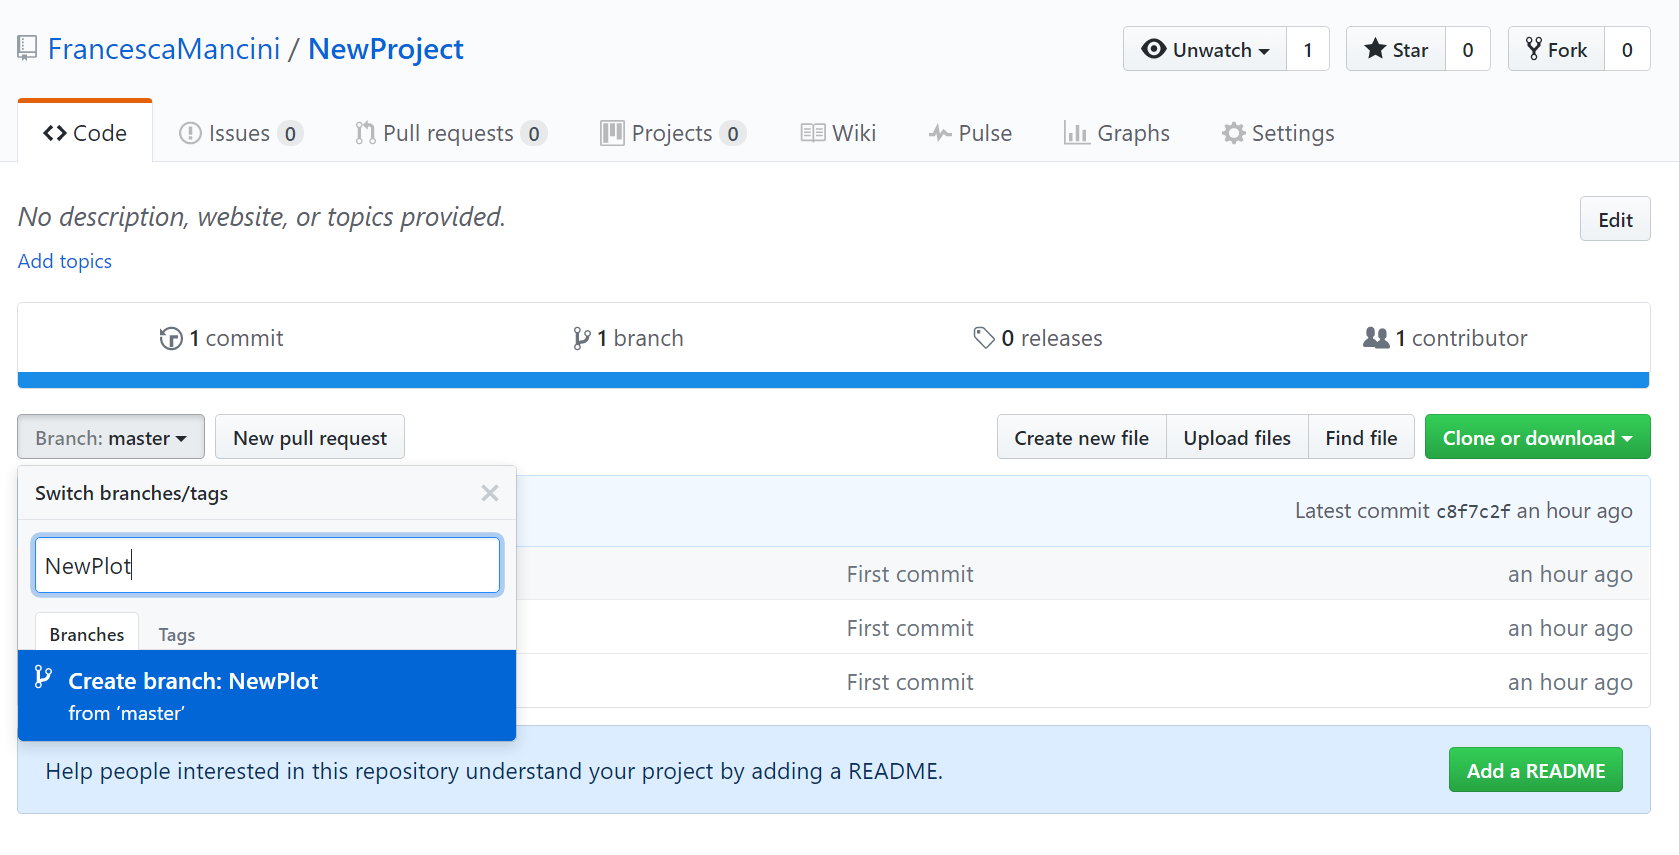
Now you have two branches, master and NewPlot. They look exactly the same, but not for long! Next we’ll add our changes to the new branch.
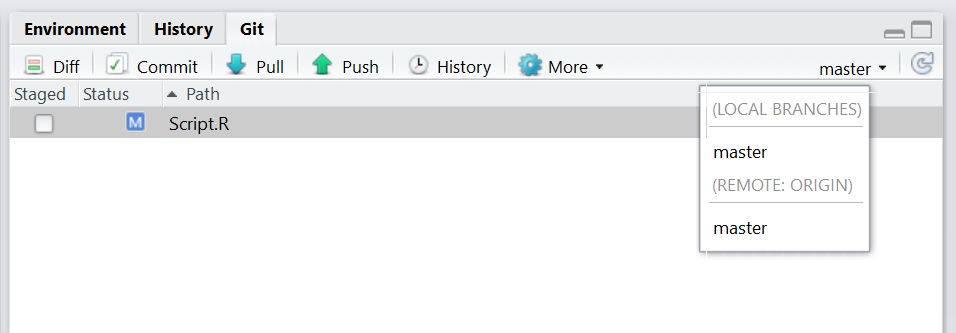
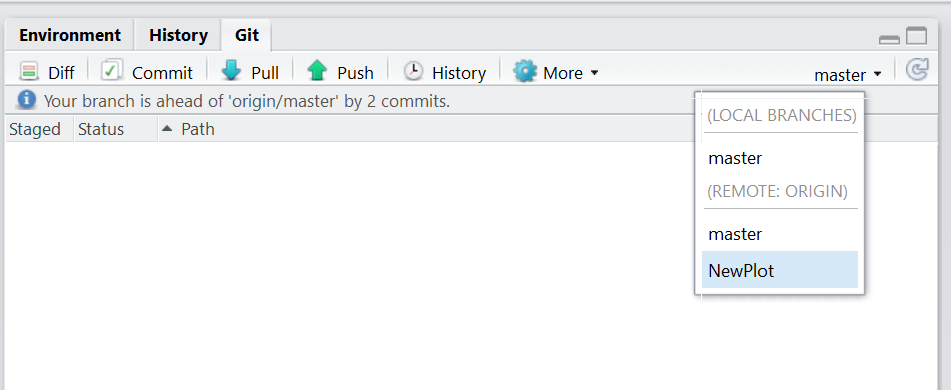
Go back to your project in RStudio. In the Git tab, if you hover the mouse pointer over the master drop menu you will see a tooltip that says Switch branch. However, if you click on master and open the drop menu you will notice that the only branch present is master.
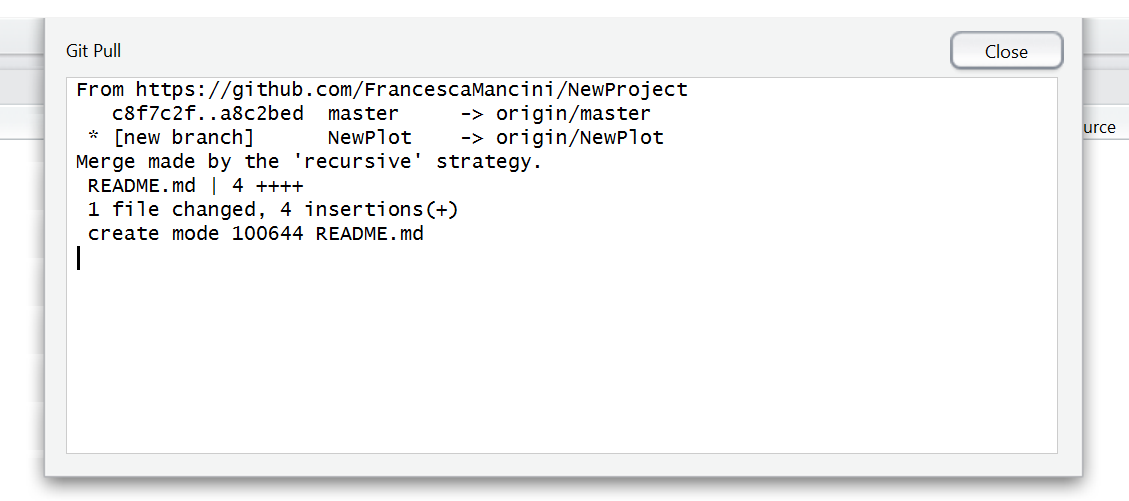
This is because we need to Pull the changes that we made to our online repo into our local copy of the project on our computer. In the Git tab click on Pull. You will receive a message that tells you about all the changes that you have made in your repo, in this case adding a README.md file and creating a new branch.
If you click on master again you will now see the new branch that you created. Click on it to switch from master to NewPlot so we can continue working on the new branch.
2.4.3. Make and push changes to a branch
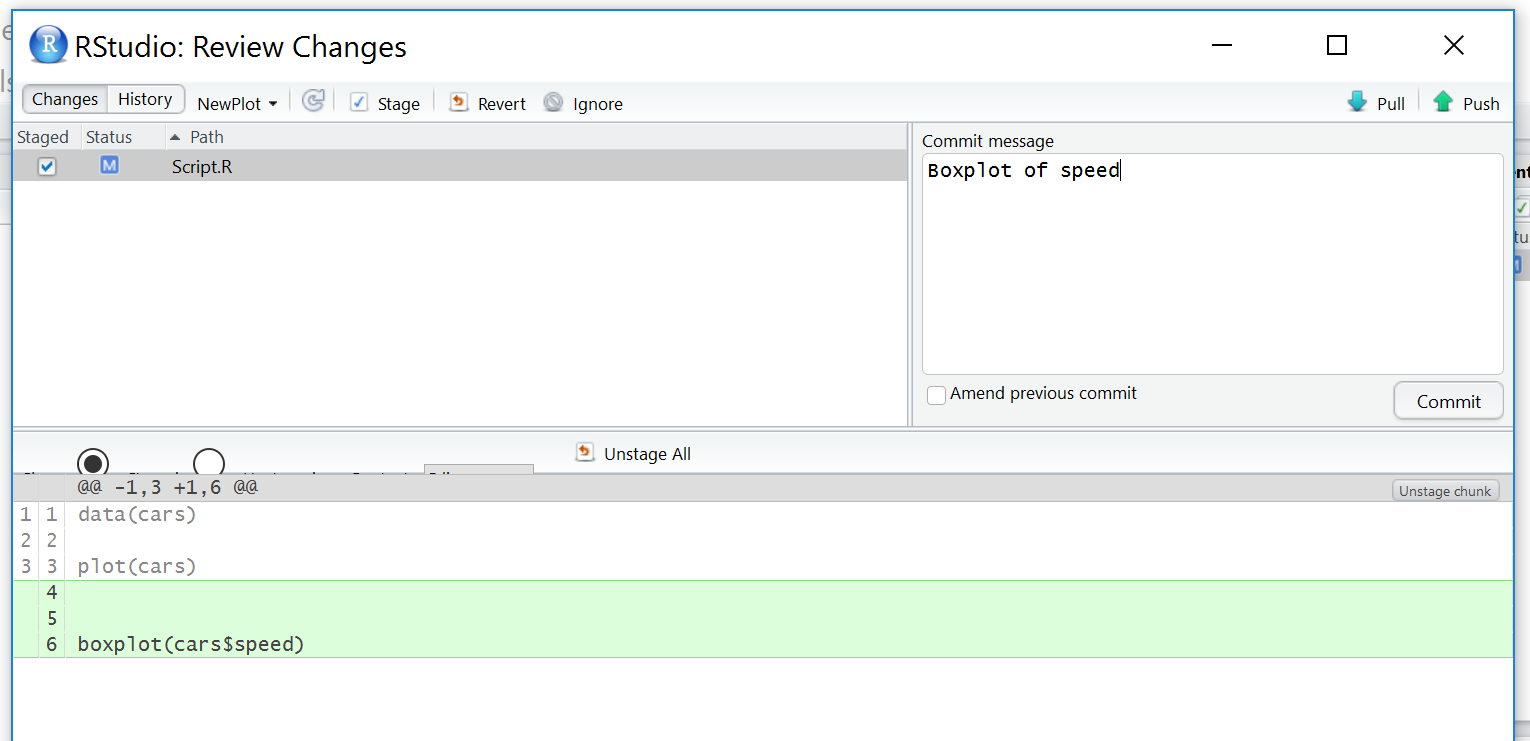
Now we can add a new plot to our script. Type the following code and then click Run.
boxplot(cars$speed)
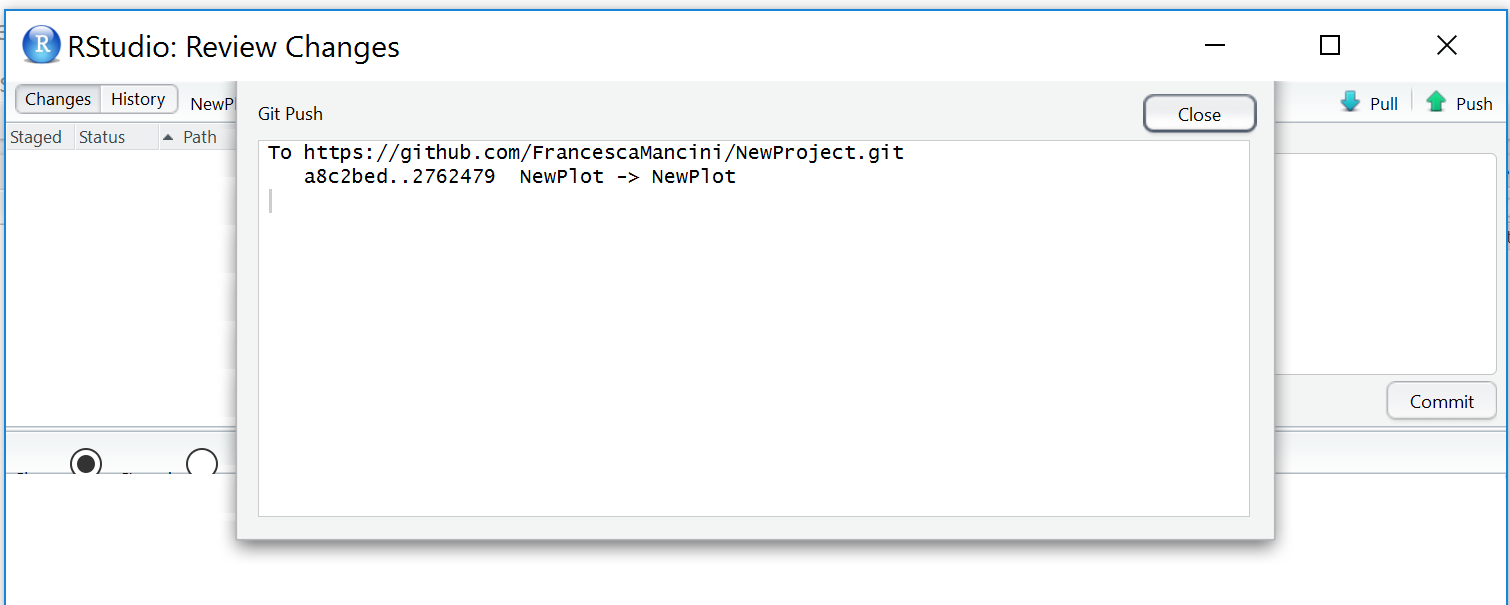
Save your edited R script, click on the Staged box like you did before and click on Commit. In the Review changes page, write a commit message and click on Commit. Before you close the window, click on Push.
2.4.4. Pull request and merge changes
Now go back to your repo on GitHub. You will notice that at the top of all you files there is a new section that says: Your recently pushed branches:. The changes you made to your script have been pushed to your online copy of the project and are now in the branch NewPlot. In order to merge them into your master branch we need to create a pull request.
Click on the button that says *Compare and pull request**.

In the Open a pull request page click on Create pull request.
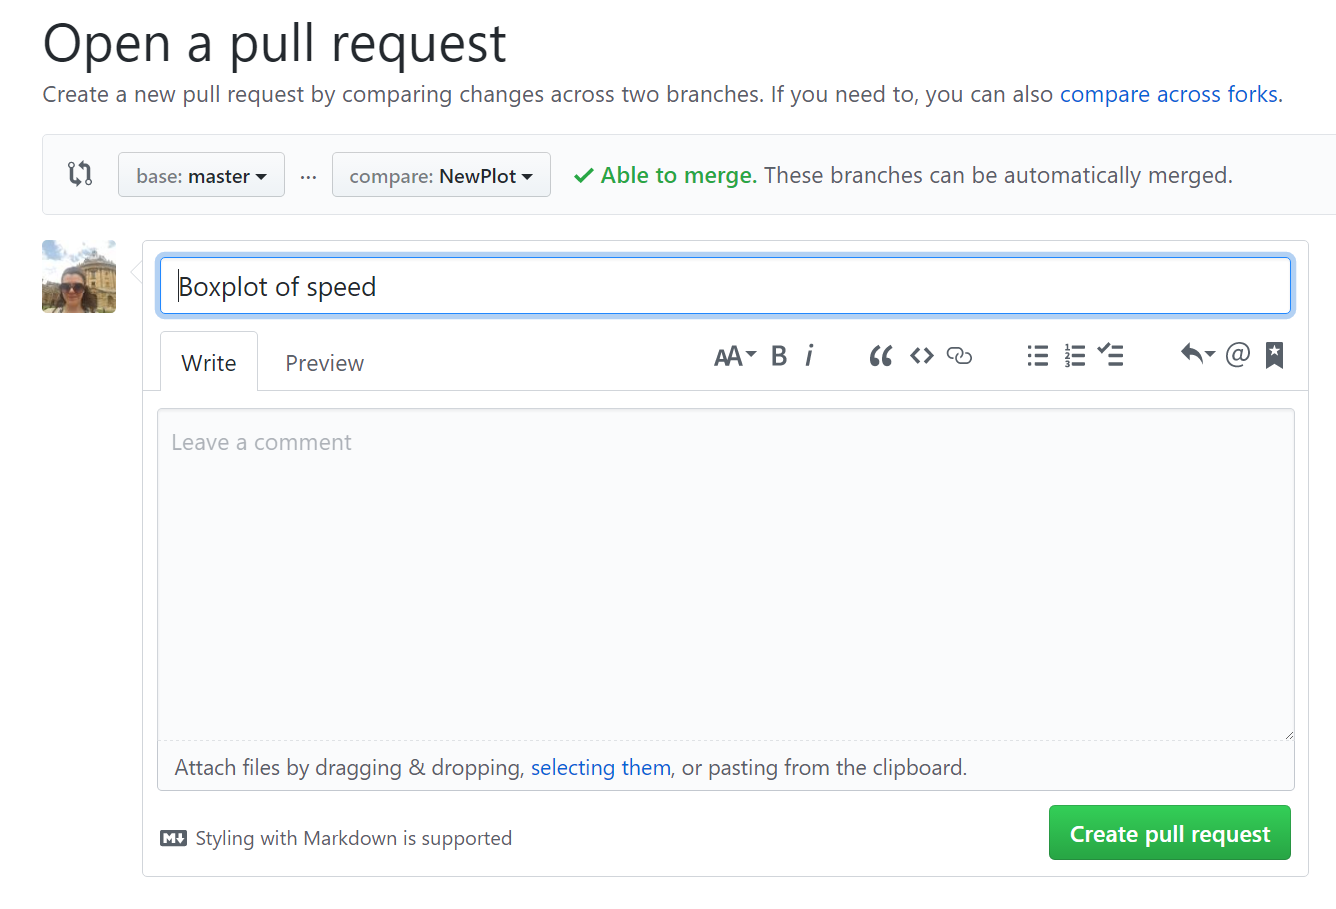
GitHub has now compared the two versions of your project that are in the two branches, master and NewPlot and it is telling us that there are no conflicts between the two versions.
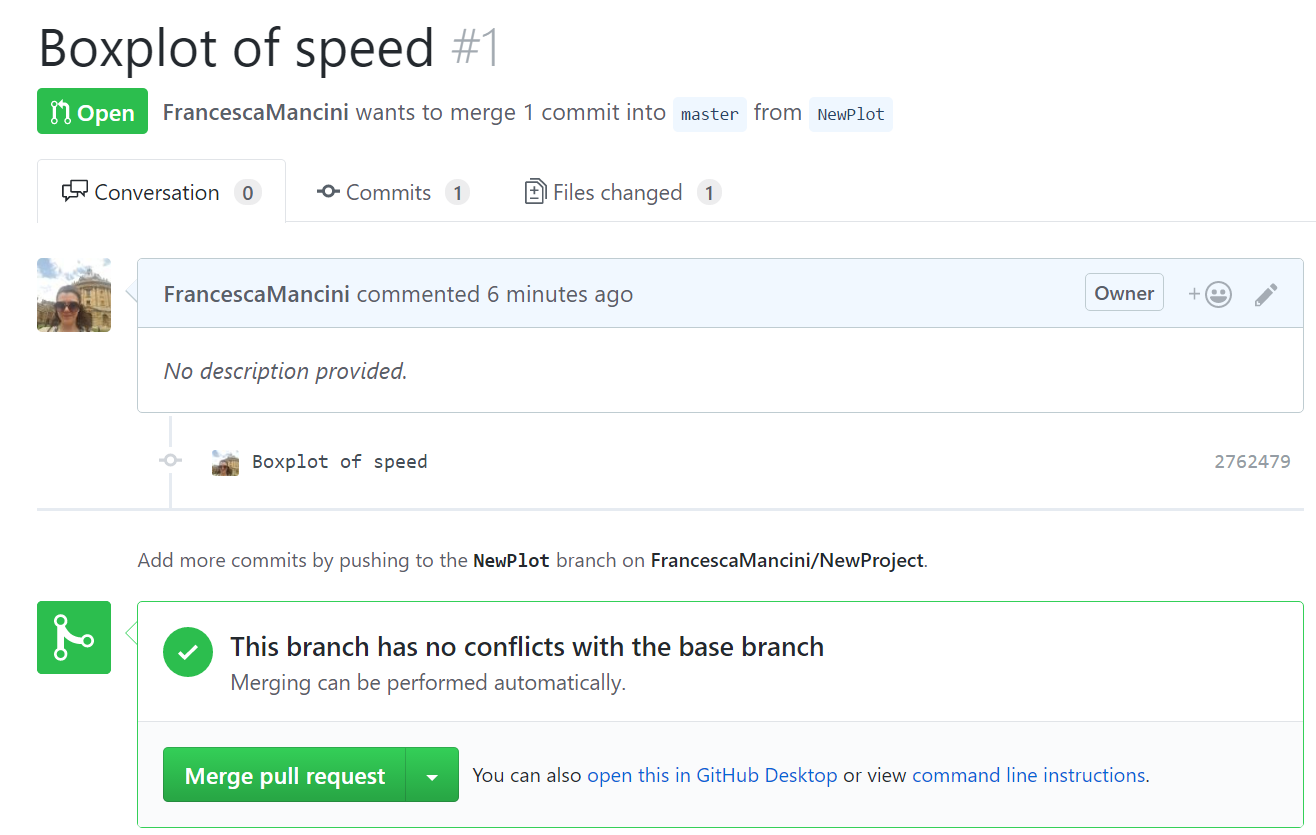
Now it’s time to bring your changes together – merging your NewPlot branch into the master branch.
Click the green Merge pull request button to merge the changes into master.
Click Confirm merge.
Go ahead and delete the branch, since its changes have been incorporated, with the Delete branch button in the purple box.

3. Summary
Congratulations!
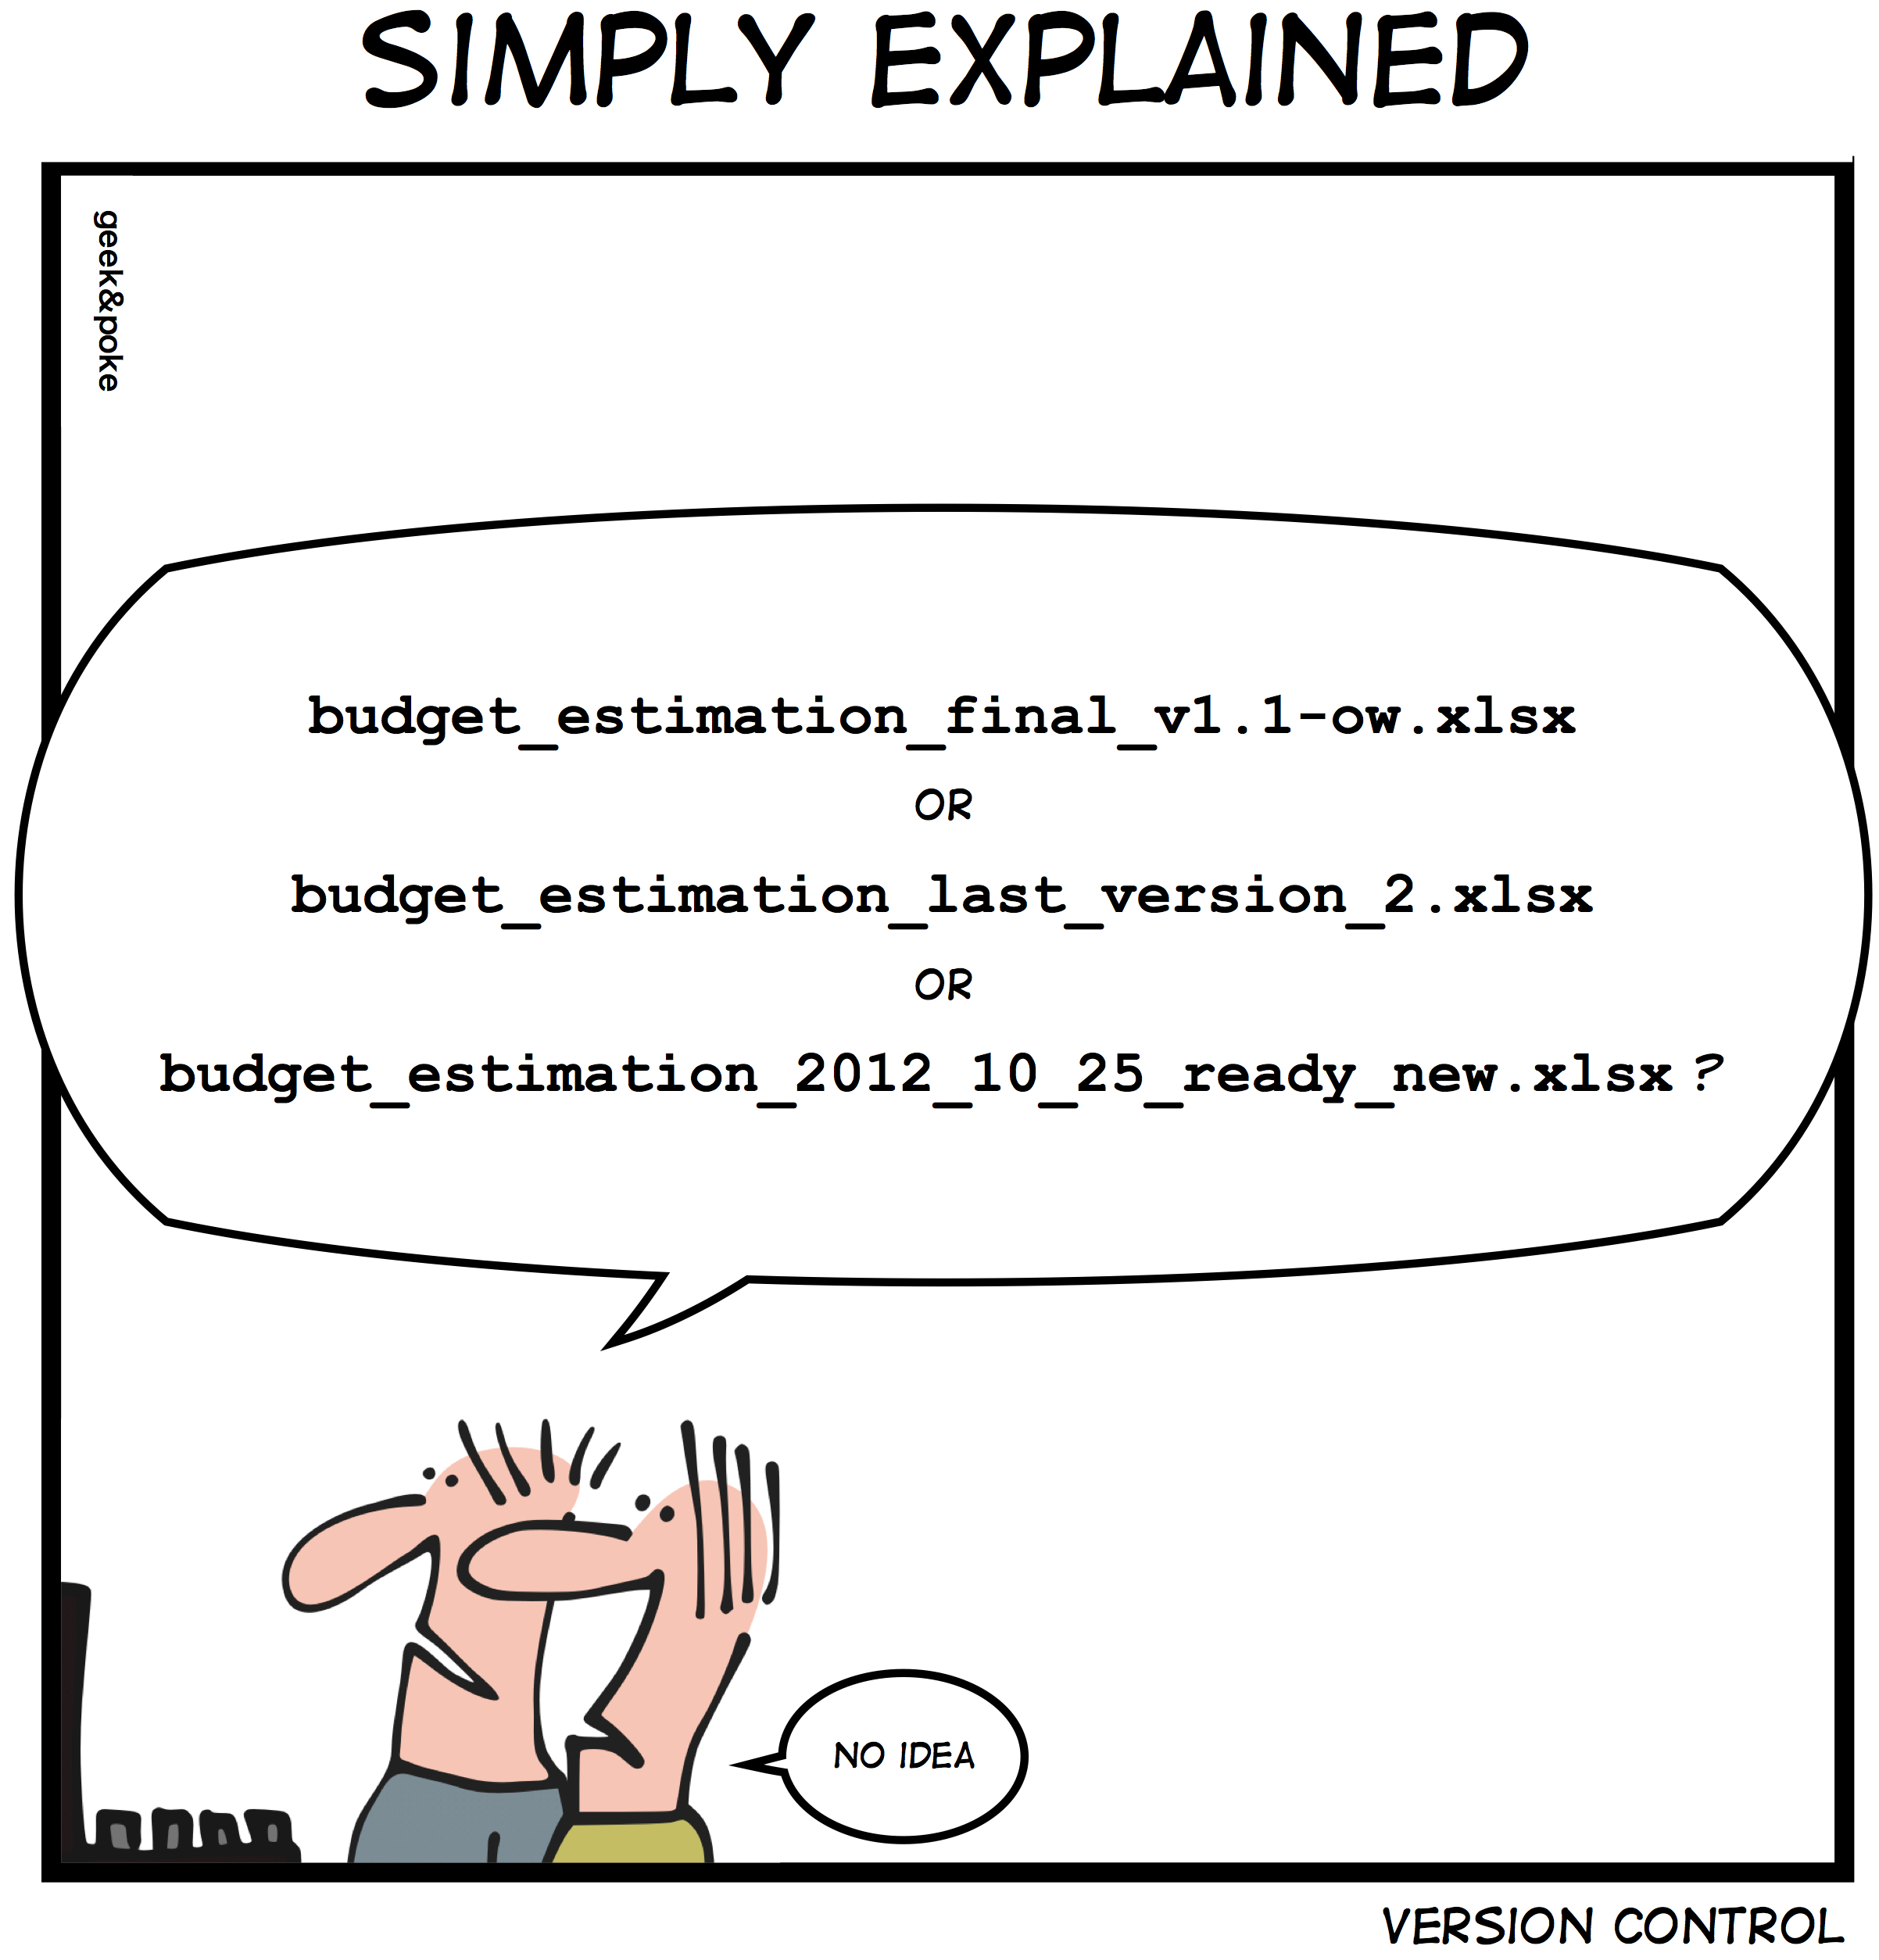
You now know how to set up a version controlled project with RStudio and GitHub and your computer will never be full of v1.R, v2.R etc again!
You have seen that the standard workflow loop for version control in RStudio is very quick and simple:
- Create a new branch
- Make your change
- Stage your change
- Commit
- Push to GitHub
- Create a pull request
- Merge your changes
As well as this basic workflow, you’ve learned how to look at changes using Diff and to inspect your project’s history.
We hope you have enjoyed this tutorial and that you are now convinced that version control can make the management of your project a much easier task.
If you have any questions about completing this tutorial, please contact us on aberdeen-study-group@googlegroups.com.